Friday, December 24, 2010

Defeating Uri Geller

The best laid plans of mice and woodworkers gang aft agley, as they say. Well they do if they're a Scottish poet without a spell checker anyway... Thus it is I once again I have found myself with nothing to blog about. You might have noticed. But enough was enough, and suddenly an odd urge to make something and complete it came upon me. Why a spoon, and frankly not a great spoon either (in any sense of the word "great"), I know not. Bit of a bias crept into the bowl, so it's the world's first right-handed mustard spoon. Yup, needs work.


Anyway, here's hoping for a bit more actual w'shop time in the new year. It's not as though I'm going to be able to spend time by the fire instead - there's no room...


Which merely leaves me to wish my reader

YULETIDE FELICITATIONS!

See you in 2011.

Monday, December 13, 2010

Ship augers

As I happened to suddenly be spending so much time in the w'shop - and with the camera handy - it occurred to me I could snap a pic of those single twist, lead screw-less augers. Amazingly I knew exactly where they are; hanging safely on the wall of the timber store. Alas, I'd forgotten what lay betwixt me and them in the narrow gangway of said timber store...


Bedlam. And I must find somewhere safer to stow the saw vice. However, using the genius of a zoom lens you can see they do actually exist:


My notes tell me the bulk of them are 24" long, so should you wish to bore a hole in something on the bench whilst standing on the other side of the workshop, let me know.

Anyway, that's my little cache of shipwright's tools, should things ever reach the point where an ark is necessary. A caulking mallet and irons, the ship augers and adjustable auger handle, and a mast or spar shave or knife (A heavy duty large-sized drawknife). Of course, one can only hope that by the time the flood comes I'll have tidied up so I can get to them. We'll draw a veil over the laughable idea that I could get any project finished before I was already 200 ft under water...

Saturday, December 11, 2010

Profile appendix

I can give this up any time I want. Yup. But I had to try the edge trimming plane idea, didn't I? Of course I did. Don't you roll your eyes at me...

So I raided the exotics scraps box. Bearing in mind what I keep in the regular scraps box, you may imagine I hang onto the minutest fragments of such things as Rosewood, Box, Purpleheart, Nutmeg (Yes, Nutmeg) and Ebony, and you'd be right. I used to wonder about the sanity of this - although why this and not about everything else is anyone's guess - until I read The Tool Chest Of Benjamin Seaton wherein the inventory of contents includes such things as Ivory (1" x 1/4") and "four fragments of tulipwood cross-banding". The way things are these days, a whole cornucopia of hardwood species are getting to be as valuable as Ivory, so I hang onto them all and feel not a qualm.

Thus it was that I found just the thing lurking between a 1" long (1/4" square) piece of Pink Ivory and a 1/2" square piece off boxwood. Don't laugh; they're just the ticket for Miniature Mallets such as these). Anyway, a piece of Rosewood approximately 2" long, 1 1/4" wide and 1/8" thick - from which to cut a wee fence for the wee plane. A bit of doubled-sided tape, luckily slightly the worse for age so not as terminally adhesive as it can be, was cut to stick it on.


And there we are. Simples. Naturally the thickness of the fence dictates how far in from the edge it'll cut, so you could conceivably have a whole range of fence thicknesses. Don't look at me like that; it ain't happening.


Getting the scored line lined up with where the plane actually cuts is, of course crucial and to be honest, a bit of a fiddle. But a couple of tests to get it right and then I took it for a spin on another piece of wood that died horribly at the hands of the router.


As long as you concentrate on taking a full length shaving every time, the depth takes care of itself, and the result isn't half bad.


So, as expected, it works, but unless you're absolutely lost without a fence - or have the edge trimming plane but not the shoulder plane - I'd still opt for the shoulder plane. It's a lot less fuss.

If you haven't got either, don't tell anyone, but it's a wonder what you can do with the humble file...

Friday, December 10, 2010

Determined Profile

Before we start, a little blog admin (blogmin?). As you may have noticed, I'm now requesting commenters put a name to their comments. This is an attempt to make dealing with the ridiculous number of spam comments slightly less time-consuming. If you don't put a name to your comment, I will treat it as spam. We'll see how it goes, but if this doesn't help I may have to change to only allowing comments by registered users, which I'm obviously reluctant to do. So help me avoid that, and Sign Your Name. Thank'ee.

So where were we? Here. So how does one make a profile in the edges of a very small piece of wood by hand?

Option 1. The moulding plane.
Obviously my first choice, however two good reasons for it to fail in this case. Firstly, I may have a wide range of tools from which to choose, but a moulding plane of a suitable miniature-sized profile? Unlikely. Secondly, how d'you plane something that small? Even holding it to allow the plane access is problematic in this case. I briefly dallied with taking the work to the plane. i.e. Hold the plane in the vice and move the work over the cutter. But at the correct spring angle and without planing your finger tips? Across grain?

Forget that then.

Option 2. Scratch stock (Yeah, most of you were probably way ahead of me here)
I like scratch stocks. A lot. Despite owning two, commercial beaders just don't gel with me the same way as a homemade scratch stock. I find they're often too cumbersome and, in the case of the Stanley #66, the angled nature of the cutter means you can't easily change direction when the wood demands it - one of the real benefits of scratching lost, in my opinion. So I broke out the scratch stock I made for this article in the Lee Valley Newsletter (Vol. 1, Issue 1) and filed a suitable profile in a piece of saw blade (Thanks, BB). I even went to the lengths of honing the edges on a fine Arkansas slip too. Well this thing needed to be really sharp for the task and it wouldn't hurt.


Now I don't recommend scratched profiles across grain as a rest cure. It can work well, but it depends on whether the timber wants to play ball, and that can vary not just from species to species but also piece to piece. Applying a spot of shellac first seems to help, but you might as well resign yourself to a fair amount of work with abrasives from the start and then rejoice if you happen not to need them as much as you feared.

Okay, so I admit that when it comes to comfort the commercial beader wins Scratch stocks tend to ask a lot of the thumbs and I knew all about it when I'd done.


The result won't ever be mistaken for something done by a router, that's for sure, but it was okay. The second one was worse, and I had to do some remodelling with a file. In the end I think that result was probably better anyway. For the third, in beech. I switched to using a single point cutter from Lee Valley and a slight chamfer on the top surface, which sort of looks vaguely cushion-y to me. I quite like it, but whether the little horses will, I dunno. Not to put too fine a point on it, that's all they're getting...


Naturally, it's only after the event - and the cramped fingers and, okay, yes, aching back (I must improve the vice on the bench-on-bench so it's more useful for this sort of thing) - that it occurred to me that I'd missed an opportunity to see whether some of those miniature tools could really come into their own. Naturally, I had to have a try. First I scored deeply for a shoulder/quirk/ whatever it is. Is there a simpleton's guide to mouldings out there somewhere? Surely The Schwarz has found some tome from 1904 that tells you everything you ever need to know by now. But I digress - and ever-so slightly cattily at that. Sorry, Chris. It's teasing with affection, honest. Even if you are busy putting up the price of Woodworker annuals... Anyway, I used the fairly small 3-in-1 brass gauge for that, but could have gone down in size a tad to the Pocket Gauge if I'd had one.


Then guide the Miniature Shoulder Plane against the scored line. First the back side to prevent the back edge breaking off.


And finish off the rest of the cut the usual way.

At this point I can hear some readers having kittens at the idea of trying to hit the line accurately. You don't. If you're slightly shy, the chips will tend to break away cleanly at the scored line anyway. And once you've managed one or two passes, there's shoulder enough to guide the plane. Use your fingers underneath the plane as a simple fence, take your time, and it's really not as hard as you imagine. I mean, it can't be, can it? I can do it. Although overnight I had a further thought, and wondered if a shim of suitable thickness (or rather, thinness) double-sided taped to the fence of the miniature edge plane could give you the same result, but fenced. And a skew cut for added cross-grain loveliness. Not tried it yet, but don't see why not.

Then to the fairly small, but not actually miniature Little Victor Block to round over the edge.


Alas, it was a piece already chewed by the router encounters so I couldn't complete it to demonstrate a good finished result, but after a little work with some fine-ish abrasive, you can get the gist. Not bad really. In fact I'm not a little annoyed I didn't think of it earlier. Sigh.


Anyway, I have Made An Effort - which I hope will at least be something. It was also a challenge which got the old brain cell working on something wood-related for a change, and that can be nothing but a Good Thing. As a bonus I'm finding the idea of dealing with large lumps of Southern Yellow Pine suddenly rather appealing in comparison. Yes, gentle reader, the workbench thoughts are a'stirrin' again. Take to the hills.

Thursday, December 09, 2010

Profile Problems

Or How I Remembered Why I Hate the Router.

The tailed router, obviously. The hand router I like. If you were to see how many I have of the darn things (and in truth, I'm not absolutely sure myself) you might say I have a router problem. This is not so; they've just kind of accumulated. At some point there's going to be the mother of all tool sale lists, honest.

No, it is the Tailed Demon that I hate, loathe and do my level best to avoid. I think all my really serious woodworking disasters can be traced to the router. The plunge lock has failed, the collet's failed mid-cut, the whole thing has just ceased to work after very little use, that sort of thing. The electric router and I are Not As One. It's largely responsible for my embracing of the humble hand tool - essentially it boils down to the fact that I can't muck things up quite so fast with hand tools.

But a friend made a request. Yes, I can hear the seasoned woodworker saying "Uh-oh" already. But no, there was no pressure, and if I was to back out entirely I was given to understand our friendship would not automatically be at an end. But ya know how it is; you want to please, don't ya? So I offered a tentative "Um, o-kay...". The task? Little wooden plinths for model horses.

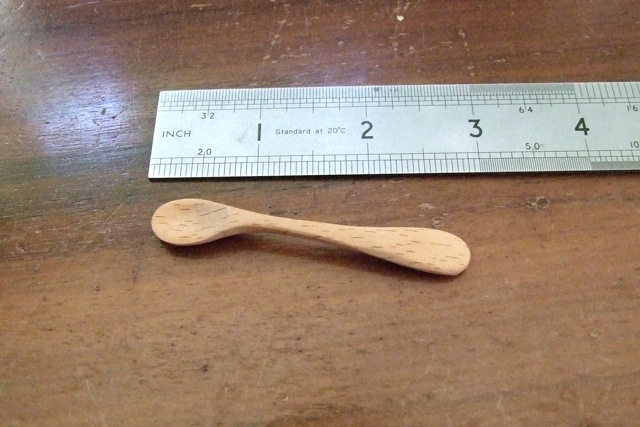
I'll be honest, I'm not a fan of real horses, and the idea of having models of the daft creatures about the place leaves me as puzzled as my elder brother's desire to spend his limited spare time trying to wire up his model train layout. But there we are, model horses it is. You customise them and stuff, I gather. There are shows. Anyway, my second mistake. I'd failed to appreciate the sizes we were talking about. These things are small, ergo the little wooden base upon which they decoratively stand are thus also small. The longest dimension was no larger than 110mm (approx. 4 3/8") in this case. So essentially we're talking very small bits of wood with a profile round the sides.

Obviously one for the scrap box then. If you've been following this blog for a while, you may have noticed my "project stock" would sometimes struggle to make it into some folks' off-cuts bin, so you can imagine what my scrap box is like. But the gods gave this sucker a break and offered up some suitable stuff for the required three bases, plus some spares. Just as well about the spares really. So I planed it up, cut to size, all ready for the fancy bit.

Obviously this is the kind of thing the router lives for, right? In other hands, yes. In mine? Well, it went like this. First I went to the Drawers o' Cutters, hacked my way through the cobwebs, and refreshed my memory of what profile cutters I own. It turned out there were two. They came in a set I bought, ooo, waaaaaay back when I first started my running feud with the router. The set was by Freud, which could have been taken as prophetic - the use of them leading me to the brink of needing some sort of psychoanalytic help. Anyway... One was an over-exciteable Ogee which was too large for the 10mm thick stock. The other an Ovolo. Or rather it would be if I could get the bearing off in order to make it one instead of a fairly tame roundover.

I've never removed any of the bearings from any of the cutters in that set in all the years I've had them. I know what you're thinking; I was thinking it too. I laid my hands upon the appropriate hex wrench and... it came undone just like that. I didn't know it then, but the gods were merely lulling me into a false sense of security. So no bearing, and given the size of the workpiece anyway, this was a job for the router table.

If the reader has a long memory, he or she may recall I couldn't resist a "bargain" and bought a Piece o' Tat ( ™) router table during a fit of insanity.


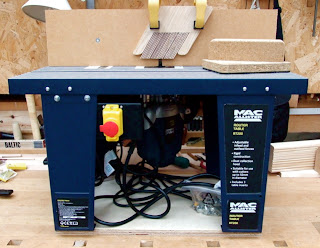
I'd love to say it's proved itself a useful w'shop stalwart, but in truth I've not had call to use it. In the back of my mind I had a thought to leave it permanently set up to do stopped grooves for box bottoms - a task I do not relish with hand tools - but first you need to make something approaching a box side to groove. Anyway, now it could shine, and so I cheerfully fitted the cutter in the collet, finger-tightened it and looked round for the collet spanner.

Which has gone AWOL.

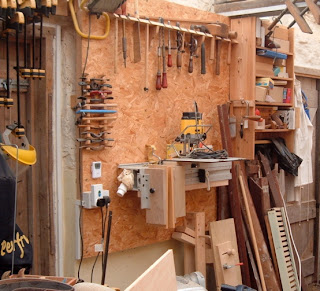
Okay, not a problem. I have a wide range of spanners for all eventualities always handily hung on the wall. I selected a couple of probables, found the 24mm did the job, and finished tightening up. Then I went to adjust the height. With 10mm thickness to play with, this is an exact science. Half a mm here or there made it look All Wrong. This router is not designed for exactness. Which, as it turned out, was lucky, 'cos that matched the router table it's fitted to. Eventually I got there, lined up the fence, clamped the table to the bench, got out the My Little Dalek 'shop vac' and went to apply hose of same to dust extraction point in fence. Which didn't fit. Where is my all-rounder, rubbery, fits damn near anything, hose reducer doodah?! Gone! Vanished!

Reader, this was a numbing blow. I've had that widget since the early days and it's saved my bacon on numerous occasions. But extensive search has failed to find it. I admit I may have directed suspicious and pointed glances at the Old Man, but he claims innocence. What's worse is a replacement apparently demands spending over Eight Earth Pounds. Egads. And you just know it'll turn up as soon as the new one's on its way...

However, I recovered from this shock, dragged myself from my knees (whence I had fallen, a cry of "Noooo" torn from my devastated person), slapped myself about the cheeks and advised myself to get a grip. Which I did, with the aid of a clamp and directing the hose in a general router direction below the table. Cutter set - check. Extraction set - check. Power on - check. Fire up the Piece o' Tat ™.

For the love of Norm, now I remembered the other reason I hate routers. Just running the thing makes it sound in horrible pain. Actually risk adding wood to the scenario and the thing sounds like it's being tortured with red hot pokers. Reader, I applied wood to router, but in truth my heart wasn't in it and it knew it. It chewed, it spat, it managed to defy all logic and create a result that shouldn't have been physically possible. Feeding finicky little pieces that demand pinpoint accuracy to get a reasonable looking result into the jaws of that router table with, as it turned out, sufficient enough flex in its top to make the result look like hell is not for me. It wasn't for the wood. The router wasn't keen on it either. We decided a mutual separation was the best answer. The router gets the cutters and I can take them to the zoo one weekend a month - if I want to - and I get the w'shop.

Now about now you're saying "But Alf, you could easily make this jig" or some other sound advice. And you're right, I probably could. But while I will apparently spend hours on the end result, I absolutely loathe spending a moment on making jigs. Especially when I won't use the thing again - and chances are it won't work for me anyway because it involves a router. Besides, I had another Thought.

I own a WoodRat. You have to be wondering why, given the preceding anti-router sentiment, but I do, and I'm reluctant to sell it because it is useful. It's probably been responsible for nearly all the successful routing I've ever managed.


The WoodRat could hold those finicky little pieces easy-peasy. A nice controlled cut, easily set up? What could go wrong. Well there's just one problem with the WoodRat; by the nature of the rodent you lose a certain amount of depth of cut. Naturally I'd forgotten that. I put the bearing-less profile cutter in the DeWally, plunged merrily away and...

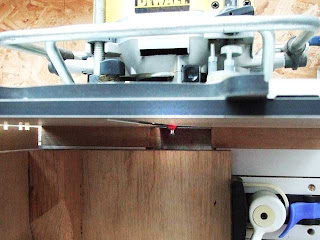
See that fragment of red in the middle of the picture? That's the cutter at full plunge depth. Yup, about as much use to me as a chocolate fireguard.

By this point I'd spent an hour getting absolutely nowhere, I was extremely fed up, depressed at all the reminders of how things had got up and walked away waiting for me to actually ever being in the w'shop again, and to top it off had managed to nick my fingers on the cutter not once but three times simply because it was so cold I couldn't actually feel my fingers. I was about ready to declare I would henceforth go through life utterly friendless and be better for it. You don't want to know what I'd have done to any model horse unwise enough to gallop across my path at that moment.

So I went and considered some suitable phrases to break the news to my friend. My sorrow and regret would drip from every word, but alas, the w'shop had burnt to the ground and I couldn't do it... No, no, Alf! Is this the attitude that founded empires? It is not. Empire builders tended to steer clear of routers and favour the honest toil of subjugated natives. I wondered if I could find a Cornishman to do it.

No, I didn't really. As ever, I turned to hand tool methods to see if they would save those little horses from going plinth-less. But I'll tell you about that tomorrow...

Friday, December 03, 2010

Not so routine drill

So we have some theories.

I quite like the idea from Michael and Stephen that it's the lead screw that makes it an auger rather than a drill bit. Except what about the bull nose Single Twist or L'Hommedieu variety with no lead screw?

Wadda you mean "The what?" You don't all have them in assorted sizes...? I do. (Auger problem? What auger problem...?) But unfortunately I have a slippery slope of the icy rather than the toolish variety twixt me and a photograph of same. But trust me, very definitely augers without a lead screw. Favoured by shipwrights, I gather. (Ah, Darrell LaRue's page has some here. Couldn't find that page when I looked before; thought it had died. Does the world need another brace bit reference? Probably not. That'll save me some work then...)

Howard wisely zeroes in on the spiral or helical screw of the auger, but as we know, the average person asked to point out a drill bit would pick out something also with a spiral cutting edge. An email correspondent takes it further though, and I think this may be the closest we'll get to a rule that'll stick. Viz:

"We typically call any drill bit where the helical vein is less than the root diameter a "drill bit" and any drill bit where the helical vein is larger than the root diameter an "auger bit.""

Bend your brain to that one, gentle reader, and see how you like it. It doesn't cover every eventuality either really, but I think the essential problem with trying to define the difference is the initial labelling is rather wayward. We know from custom what we'd call an auger and what we'd call a drill bit, but how often does custom come into being based on a precise and technical definition of something? Yeah, exactly. We may be on a hiding to nothing here.

Happily though, we have side benefits and discussion as a result. Such vital questions as "Why do catalogues list braces and not the bits to use in them?" and "Whither the forstner bit?" These are good points.

The forstner bit for braces, I have no idea about. Where are they? I've never seen a single one. Not one. Not even my encounter with the patternmaker's tools lead to finding any, and that was as likely a source as any. Like 12" and 14" braces, were they just something listed in catalogues but really only Americans ever bought them? I have no idea. Of course there are modern ones with round shanks, which leads us to question two...

Modern braces, but no brace bits. I confess I was a little horrified to hear this. Last I checked - and in fairness, it was a while ago - Axminster, for one, listed Clico Jennings Pattern auger bits. But not any more. Lee Valley has a few square-tanged brace bits, such as these Spoon Bits, but it is indeed a bit of a desert out there for new bits. Having said which, do not modern braces tend to be designed to take hexagonal and even round shanks? I know certain older models of brace chuck were also able to do that, and indeed a basic two-jaw brace will generally cope with hex-shanks pretty well in my experience. So you could argue they are listing bits that'll fit the braces they sell, they're just not what any right-thinking neanderthal would consider the bits of choice.

Personally I think a serious revival of hand boring methods is well overdue and we should all jump on the band wagon in a hurry before The Schwarz finishes inadvertently putting the price of admission completely out of our reach. Although I'm still kinda hoping he'll discover the joys of a fluted drill bit in a hand drill so someone'll put them back in production. In the meantime, I fear it's to the car boot, the flea market, and the dreaded online auction site if we wish to feed out brace bit habit.

Which we haven't got. Well I haven't; can't speak for you...

Tuesday, November 30, 2010

Routine drill

Weather's not so hot here in Blighty at the moment. When I say "Not so hot", I don't just mean figuratively speaking either. It's bloomin' perishin'. Just the thought of laying hands onto the cold metal handle of a #044 or a #78 rebate plane chills me to the bone. So in a bid to avoid actually having to venture out into the icy wasteland that is my workshop, my mind turned to things to muse over without leaving the comfort of the fan heater at my feet.

Now all the time discussions crop up on the various fora and message boards about certain things. Can't think of any at the moment, except one... But anyway, it happens. And every time I think "I have just the thing (usually a photograph) to answer that query somewhere, if only I could find it". But I usually can't, so I don't. But I thought might it not be handy to build up a library of blog posts that could act as a reference for that sort of thing. Like... Oh, just thought of another one. Chisels. A basic photographic guide to different chisel (and chisel handle) varieties. Handy, yes? Can't off-hand find a pic of the leather washer on a registered firmer chisel? Find one here, kinda thing.

Naturally I don't have a wide range of clear chisel pictures about my person, but I do happen to have quite a few of different bits for the humble brace. Excellent; everyman's (and woman's) guide to brace bits. Except The Muse is feeling a little chilled too, and it's turning out more boring than Boring. So it needs to marinate a little and will turn up another day.

However, this did throw up an unexpected question from a non-woodworking friend. One that left me feeling a bit stumped, actually. Viz:

What's the difference between a drill bit and an auger?

At first glance, I bet you opened your mouth and said "Well, that's eas-" and then maybe it wasn't. Or maybe it's really obvious and I'm just being a clot. That wouldn't surprise me; I don't function well while my teeth chatter. Either way, the comments box is Open. Do your worst.

Monday, November 29, 2010

Me Tarzan

Right, as promised, the flip side of tool decoration. Anyone easily offended may wish to look away.

Hang around in the world of tool acquisition for long enough, and you'll eventually hear the phrase "The Mother Lode". I'm not absolutely sure who coined the phrase, but the gist is pretty obvious. You've hit the seam. There's gold in them there hills. In short, it's often a lot of particularly lovely tools all at once. If you're good and eat all your greens, you may happen upon one in your lifetime. Nearly eight years ago, I hit mine. And, as is so often the case with a mother lode, the source was a patternmaker.

But I don't want to bore you with that tale now.

It's enough to say that amongst the goodies were some rather nice paring chisels and gouges, including a couple of boxwood-handled examples. Mr Thomas, for such was the name of the patternmaker, had acquired one 1 1/2" paring gouge and one 1 1/2" paring chisel, previously owned by an R G Roberts. Here's the chisel; is it not a thing of majesty?


Mr Thomas was but 18 at the time and keen to personalise his new acquisitions. Naturally enough, being a young man only newly in the working world and tool ownership, he put some effort into it. As it happens, Mr Thomas was one of many millions of gentlemen who followed the adventures of "Jane" in that well-known national newspaper, the Daily Mirror.

For those not in the know, "Jane" was a comic strip in which the hapless, but comely Jane, found herself caught up in all sorts of misadventures. Oddly enough, she often mislaid one or all of parts of her outer clothing while so employed. She never caught on in the States, being considered decidedly too risqué, whereas she was very popular indeed in Britain. Go, as they say, figure. Legend has it that it was Jane losing all her attire lead to a significant 5 mile advance by the British Army in North Africa during WW2, but that's very difficult to prove. Anyway, you get the gist. She certainly captured the embryonic patternmaker's imagination:


And on the gouge, this full height portrait:


Pretty tame stuff by today's standards, but you had to feel for Mr Thomas - naturally enough it never occurred to him, 50 years later, that he'd be explaining this to a potential buyer who also happened to be female. But I was honestly more interested in how he'd done it. Apparently he cut out the comic strip, temporarily glued it to the handle and scratched the lines through with an awl. "How did you blacken them?" asks I, thinking of India ink and such. But no, it was just the accumulated grime from his fingers well rubbed in. Although I think the underwear was probably inked in afterwards...

Now I have to say this wouldn't be my first choice of tool decoration any more than a bunch of flowers, but as a snapshot of that owner of that tool at that moment, it's a little bit of social history. I wonder if there's anything comparable being done now? Anyone installing USB sticks in chisel handles yet? Now there's a marketing idea...

Wednesday, November 24, 2010

Blooming Lovely

If there's one thing in tool marketing that annoys me more than any other, it's an over-priced piece of tat that's aimed at the female market by virtue of being pink. Or having flowers upon it.

Or - at its zenith - it has pink flowers on it.

I do not see flowers; I see red. By all means put flowers on tools and make them pink if you must, but is there really a law that says you can't at least apply this to decent tools? And please, please, do not put them on a useless tool and then have the gall to charge double or triple just because it has flowers on it.

But most of all - and this is really, really important - do not even think about how amusing it would be to give me such a tool. Really. Don't. I will hunt you down and my weapons will be sharp and with absolutely no flowers visible at all. Neither will they be pink.

And breathe.

Okay, so having clearly ranted stated where I stand on this particular matter, imagine my confused reaction when I was browsing the online-available section of The Art of Fine Tools on Google books and stumbled on the Morris Patent plough (plow) plane.


Now that's a tool with flowers that I could look upon with favour. Just love that scissor-style fence adjustment.

But it naturally caused me to wonder why. What was the thinking behind decorating these ploughs (plows) with such a floral decal? It seems so... random. And yet, when I come to think about it, what about the floral castings of early Stanley plough and combination planes? So what's with the flowers? Is it a plough thing? And can I persuade everyone with a floral casting Stanley that really they're tools for girls...? ;)

Prod me with spoons if I don't post again this month, because I have some quite different tool decoration to share which should successfully counteract this florid entry.

Monday, November 22, 2010

Micro Bevels

Sometimes I'm really, really glad I bit the bullet and learnt to hone freehand. Like, for instance, this time:


Okay, so I didn't actually try it in a honing guide, because... Well, I mean, come on. Although before you come on, do pause to appreciate that fine machining for the blade bed. Okay? Got that? Right.

So faced with this stonking great big hunk of A2 steel, I bethought me to turn to the instructions; bearing in mind those clever Lee Valley elves have provided cunning dodges for holding awkward blades before. And found:

"Blade Sharpening
The 0.060" thick by 1/2" wide A2 tool steel blade has the bevel ground at a 25° angle."

And that's your lot.

Gosh, that's helpful... The Mk1 honing guide it is then. R/H version.


The Schwarz is associated with cut nails - I do bitten ones. Sorry about that. Must try and remember to get some stunt nails for these things. Something with some nice sparkly-pink girlie polish...


And behold, if you look carefully you can see a nice little secondary bevel all honed and ready to go. Although, on reflection, describing anything to do with this plane as "little" is just a tad superfluous.

I was a little concerned as to exactly how tricky it'd be to set the iron. I've read mutterings on the difficulty of getting the edge so the tool actually planes at 90° to its fence with the normal-sized versions, so what would this one be like? No adjuster and very little fiddlin' room. In the end I had a brainwave and adapted a tip out of the wooden plane-setting manual. Viz: One block of hardwood, one face and edge at 90°. Place plane tight against same and push cutter down so the edge just nicks in the surface evenly across. Tighten lever cap.


Then I looked at the blade setting instructions for the normal-sized version - and found not dissimilar advice. Oh well, great minds...

Now for the fun bit; time to hit the scrap box and find something suitably thin. Oak seemed to be flinging itself at me and nothing else, but it's not a bad tester. First, some pretty thin stuff to ease us both in:


Ooo, look at the pretty curlies. More! More! In fact more of a challenge - a piece that's absolutely the upper limit of planeable thickness. Actually I had to take a couple of shavings off it so the blade could span the thickness:


Oooo, different pretty curlies. Me likey.

Okay, I'm sickening you now, aren't I? You're rolling your eyes and muttering about how could anyone mistake me for a serious tool user. Okay, out with the square it is then, you practical types:


Perfecto! Houston, we have a miniature edge that is definitely trimmed. Job done, tool proved, case closed.

And as a result I will absolutely not be tempted by the big one. Nosir. I don't like edge trimming planes. Nope. Silly things. For collect- Er, I mean. No. Um. Er. Well. Look, I can explain...

Tuesday, November 16, 2010

Twice As Handy


Getting a, um, tiny sense of déjà vu all over again? Yeah, me too ;) About the only way El Presidente was going to get me to voluntarily purchase an Edge Plane was probably like this. What can say? It's small and cute and I couldn't resist.


Fully working, I gather. Haven't tried it yet. I mean, that'd require me to break my duck and use one of these confounded planes. Cripes, what happens if I like it and all my baseless prejudices are blown away?!

So to a rather safer small plane - one that doesn't work. Arguably you could say that for all my planes if you based it on the amount of board footage they've traversed in recent years, but moving on...


Isn't it sweet? El Presidente teased me with a pic of dozens of these lined up during production, and I knew I was doomed to buy one when they came out. I love the detail, although the rear tote is actually even worse than the original.

(What? Yes, okay, so Alf is bitching about the handles again. Hey, you can't say I'm not consistent. And insane. The level of tote comfort on a keyring being a little esoteric even for me.)

Quite by chance the level of detail on this one extends to a mark that looks as like as dammit to the effect you'd blench over if plane sole accidentally met nail. I rather like that. It suggests it's a user. You know, just like I am.


Right, stop that laughing at the back RIGHT NOW. Yes, you. Don't think I can't see you.

Anyway, a lot of needless whittering to say "A LV parcel came and I wasn't stung by customs." Woot!

Wednesday, November 10, 2010

Out of the mouths of babes and long-haired fools

I imagine some of the UK-based readership might have glanced at James May's Man Lab on the telly. Load of useless twaddle - it's essentially a Top Gear approach to practical skills and the modern man. i.e. As much use as a chocolate fireguard. However, I'm prepared to forgive Mr May a good deal, because it's quite entertaining. But mainly because he came up with the best description for an electric router. Viz:

"A Router... The perfect tool for ruining things quickly."

All too true, in my experience. Although in the case of the Man Lab they seemed to be making a good stab at it with pretty much every tool they used... ;)

Thursday, November 04, 2010

Looking Back

Okay, so the shoulder set off The Back, and generally my miserable carcass is holding up proceedings something chronic. Sorry 'bout dat. So, while we wait for me to fall apart into component bits, some tool history...

There are an embarrassing number of tools chez Alf that have been waiting an even more embarrassing amount of time to be fixed up and made to live again. I dived into the bran tub and fished out a lucky few for treatment. The 2ft rule is not remarkable. To be honest, neither is the "Acute" brand shave, except it had been covered in an 'orrible muddy brown finish and looked dire. I threw conservation to the winds on that one, and got rid of as much of that as possible, and what remains looks okay, I think. The blade's in fairly good order, tight in the body, and it's plated. Really it should go on the "To Sell Before I'm Crushed Under The Tottering Pile" pile, but spokeshaves don't grow on trees...


Where was I? Oh yeah, the group shot. And the tool we're going to focus on today. Take notes; I make be asking questions later...

A rosewood mortise (Or mortice) gauge. This one came from the Newlyn Tool Chest - although in truth it actually came in the Big Box o'Gauges that came with the Newlyn Tool Chest, because there wasn't room for them all inside. Gauge problem? What gauge problem.

Anyway, I'm sure some gauge enthusiast has categorised the different mortise gauge designs and given them sensible names. However I will call this "The Sort With a Manually Operated Slide-y Bit". And the slide-y bit was stuck, the fence/head/stock wold only moved when threatened with a mallet and it generally needed a bit of loosening up. Which I duly did. Some judicious scraping here and there works wonders, but don't be tempted to overdo it. Of course I cleaned it while I went, and Lo! It came to pass that instead of the "W B Raddon? ****ance" which was all I could make of the mark back in 2004 (Eeek!), I could now make out the truth:

"J B Haddon, Penzance" Really, Trust me. I squinted at it like a pro.

Oh dear; that's another one I won't be selling then. I, um, sorta collect tools supplied by Cornish dealers. In the sense that I'm not a collector though, obviously.

So, still remembering the success I had tracking down W Baker of London, I hit the Trade Directories for Cornwall, and struck gold in Kelly's Directory of Devon & Cornwall, 1893. Viz:

HADDON, Joseph Baldwin
Wholesale Ironmonger
2 Market Place
Penzance
(And resident at 13 Clarence St, Penzance)

Amazingly, Joe was one of only two wholesale ironmongers in the whole of Cornwall at that time. Onwards to the next available directory - Kelly's again, but in 1914:

HADDON, J Baldwin
Wholesale & Retail Ironmongery, hardware dealer & gun & ammunition dealer.
31 Market Place & Bread Street
TN137 (Telephone number, I believe)
(Residence now 5 Morab Road, Penzance)

Baldwin's gone up in the world a bit in 20 years. Business has expanded and although geographically he's not moved far either in business or residence, it's to a rather better class of house. Ah, a tale of business acumen and hard graft no doubt lies behind these bald facts.

As far as the gauge goes, though, it tells us little more than we already knew - it's a nice rosewood gauge. Quite good fun tracking it down though, in lieu of being able to actually do anything constructive. Only a coupla hundred to go...

Friday, October 15, 2010

Still Spinning

Okay, okay, I know what you're thinking. The blogging's slipping again. And you're right, it is. Events conspired against me, m'lud.

Firstly, I was good and finally faced up the fact I had to de-rust the bandsaw and planer-thicknesser side of the Maxi in preparation for The Bench Build (See how it's already acquiring worryingly capital letters in my mind? Never a good sign...). Only light rust considering how long they've been left untended, but enough. I employed the random orbit sander and a piece of non-woven abrasive, and frankly had to actively resist going in the house to get my dinner so I could eat it off the bandsaw's table once I'd done. Mmmm, shiny.


Yes, you're quite right. When a person starts getting excitable about the state of her bandsaw table she should probably seek help...

Then, naturally, I bethought me to have a look at the blade. Hmm, getting on a bit. No problem, I have a spare hanging up over there, I'll change it. I prevaricated sufficiently long so I ended up changing it on a Friday. Not a problem. That leaves the weekend before me to make a start on actually breaking down that pile'o'wood. But I also chose to remove the old blade before I'd taken down the old one. And the old one turned out to be the POS one that came with the saw. No spare blade after all.

Now changing bandsaw blades isn't like finding the source of the Nile, but it's not something one wants to do often either. You certainly tend to resist the idea of putting an old one back on for a few days when you know you'll only be taking it off again to put a new one on. So the bandsaw remained hors de combat until Ian at TuffSaws had shown what customer service really is and winged a M42 3tpi skip tooth blade my way in quick time.

In the meantime I had a weekend free to do something useful. Can you say tool cleaning? Obviously I opted to tackle the Record #124 - erring very much on the side of caution. When there was a choice between removing the gunk or leaving the paint/plating, the gunk stayed. The tool gods also decreed the chuck wasn't to come undone for me despite best efforts, so that required a bit of careful negotiation as well to get the jaws working reasonably smoothly. It was probably the most stressful, and to the casual observer, least effective tool clean up I've ever done. But trust me, there's an awful lot of muck that used to be on that drill that isn't there any more. Heck, you can even tell it used to be blue now!


It must have been quite a sight when brand new and shiny. There I go with the magpie tendencies again...


Given that it was obviously well used, the plating on the gear wheel teeth has held up remarkably well.


The jaws are pretty worn though. The smallest bits need not apply.


Naturally enough, I then took it for a spin. By gum, it's got a beautifully light action. I compared it the #123 and that was like driving a tank compared to a nippy little sports car. Not surprising perhaps, given the solid gear wheel vs. the open one, but it was more than that. I have open gear-wheeled Millers Falls and Goodell Pratt and they just don't have the same feeling at all. It's a nice drill. A really nice drill. And luckily I think I know just the place for it to spend a well-deserved retirement.

Anyway, that was about as productive as things got (Although a few more tool refurbs might find their way into these pages once I've recharged the camera). Yup, real life intervened, and just when I'd got shot of that I've managed to do something daft to my shoulder and can't reach for, or lift anything much with my right hand. Superb. So the w'shop time is on hold again, and worse than that, as a result I've had to withdraw from the UKWorkshop Secret Santa. Dunno how long this'll take to clear up, and would hate to leave someone high and dry.

Never mind, I can spend the time revising and re-revising the bench plans. What? You're going so soon...? ;)

Wednesday, September 22, 2010

In A Spin

It's possible I've slightly slipped off the rust hunting wagon. Something followed me home this weekend:


Yes, yes, so I may already have one or two hand drills (or wheel braces, or eggbeaters, or call them what you will). And? So? I like them, and when I see a spoked drive wheel sitting in amongst some other examples, my hand just naturally reaches for it. Can't help myself. I drew it from its resting place and noted its elegant woodwork, the fact the side handle was there at all, the fine detail on the edge of the gear wheel, the odd projection just in front of the side handle... Huh? The tapped hole in the body just in front of the main handle... What? What?

Does the main handle fit there to turn it into a pistol grip? Oh yeah.


And of course, by then, I'd turned it over and seen RECORD is rudy great big letters on the gear wheel. A Record No.124 in fact. Now I felt a tingle then, because I don't see many of them, not to say any of them. Indeed I had a nagging memory in the back of my mind that all but one of the models of Record hand drill were rather short-lived.


Anyway, I gave it the once over; spins like a sewing machine; chuck jaws a bit sticky, but they move; but fundamentally it felt right. I asked the question - of my long-time tool-dealing acquaintance in Pool Market. He recognised it was a quality drill, but give him his dues, he didn't hoick up the price to anything I couldn't justify to myself. Mind you, I was up for a lot of justification on this one; sometimes tools speak to you, not in a shiny, blingy new tool way (although that can be fun too) but just by oozing that aura of "You will thank yourself for buying me every time you use me".* When that happens, putting it down and walking away can get hard.

*With the obvious caveat that it may actually be broken but you haven't found out where yet... But hey, the risk is part of the thrill of the hunt, or so I tell myself.

So I take it home in triumph and hit the 1938 Record catalogue No.15 reprint to see what it is I have. Chuck, Gears, yadda yadda... Handle: Hollow Hardwood. What? What? I check; this one is definitely solid. Eh? Frame, Finish, etc. Then:

"All the knobs are made of Bakelite..."

Zoicks, I hadn't even noticed. So now I'm looking up how to clean Bakelite. Great. Anyway, I gather from the introduction blurb to the reprint that the hand drills appeared in catalogue No.11 in September 1932, beyond that I'm in the dark. Consulting dealer catalogues of the time didn't help either. Time to hit the 'net.

Two relevant hits, both on recordhandplanes.com. First one tells me that No.124 was among the models that was last listed in the 1938 catalogue. That wasn't offered for long then. Second hit is on the Rare Record Tools page. The info seems a bit contradictory on the handle hollowness or otherwise, but that's a picture of my drill. Okay, in rather better condition, but the same model and features.

Bother.

I threw myself on the wisdom of the Old Tools List to see if anyone knew if I should lay off the thing then and there, for fear of causing collectors of Record Tools physical pain, but the result was indecisive. So I'm going to clean it up and take it for a spin. After all, I am principally a user...

But first I was reminded of the the only other Record hand drill I've ever seen, and had yet to clean up. A late model No.123 (It's stamped 1964). Found it at the tip and was charged 50p for it (cheek); some enthusiast had drilled a hang hole through the handle at some point, and it was almost completely seized up, but everything was there, so why not?

Confucius say many things, but probably he neglected to mention that the Galoot out of practice in removing rust is advised to get their eye on something less vital before attacking a rather nicer drill. But if it had occurred to him, I'm sure he'd have considered it good advice. I certainly do, so it seemed like a good moment to finally bring that No.123 back into the land of the drilling before embarking on the 124.

As is my custom, I took it apart as much as possible; chuck, drive wheel, etc, and surveyed the damage. Some pretty crusty rust in a couple of key spots - on the chuck jaws:

Inside the chuck shell, and on the threaded area of the drive spindle:


If I couldn't get those working smoothly, the chuck would never work correctly, so I decided to take the risk and punch out the pin holding the drive pinion on the spindle. Thus I could get the latter out and dump the threaded end of it in some Hot'n'Strong (TM) citric acid solution much more readily. Leaving that, I nicked this excellent tip from Andy Seaman to clean the inside of the shell with some abrasive-inna-dowel-inna-drill. I felt a fool for not thinking of it myself, and cursed the time I've spent previously doing it by hand. Oh well. Anyway, the chuck shell came up like new, except for one area where there'd been particularly heavy rust. No matter, it was now smooth, which is the essential thing.

Stopping to check the spindle in the Hot'n'Strong, I moved to cleaning the jaws, conical washer doodah and play that game of patience known as "Cleaning Chuck Knurling". It's not perfect even now, but it's a lot better. The result was so much better better in fact, that I even viewed the three-handed juggling necessary to get the whole thing back together with something approaching equanimity.

After that, everything else is easy. A suitable awl to push the gunk from the gear wheel teeth; dunk the whole body with the idler pinion in some meths to loosen the latter up (works a treat and minimal effort); some non-woven abrasive to clean up the rust where the paint and plating has given up the ghost, and so forth. I even plugged the hang hole in the handle and refinished all the woodwork. The chuck got the lightest smear of grease inside and on the threads, all bare metal was waxed, oil where appropriate, and the result is a drill good for another 45 years I reckon.

Just what I needed; another hand drill. Well I find having to change drill bits such a bore, don't you...?

ETA: Should have included a shot of the spindle post-citric acid bath. As you can see, it dealt with that crusty area of rust just dandy.